If you’ve found yourself running a Facebook Ads campaign to promote top of funnel content, you’ll be familiar with measuring performance against the standard metrics.
Cost per click, traffic volume and CTR are all great figures to watch, however trying to dig beneath the surface and ascertain which ads and audiences are sending the best quality of traffic can be difficult in Facebook Ads Manager.
As with most things in Facebook Ads, being able to set up and apply custom conversions is a must if you’re trying to go one step deeper in your performance analysis. As we’ve discussed a few times before, having a basic understanding of Google Tag Manager and Facebook custom conversions suddenly becomes an incredibly powerful skill.
With the subject of this blog post being all about measuring content engagement (read traffic relevance and quality), tracking just how far into each piece of content your traffic is getting can yield vital clues as to what is getting you the best traffic bang for your advertising buck.
This is where measuring scroll depth comes in, and thankfully Google Tag Manager has a very easy way to help. Here’s how!
Setting up Your Scroll Depth Variable:
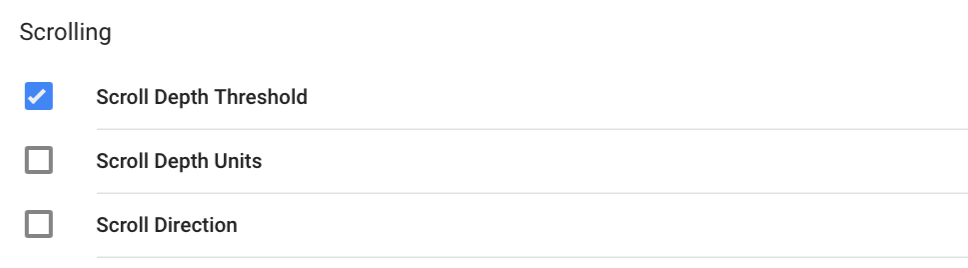
The first step you’ll need to take in Google Tag Manager (GTM) is to enable the Scroll Depth variable. As a simple explanation, by taking this step you’ll be allowing GTM to ‘listen’ to how far down each page a particular user is getting.
As with a number of different elements, GTM has a built in variable for scroll depth so all you need to do is enable it for your container. In this case, we’re going to enable the ‘Scroll Depth Threshold’ variable:
Setting up Your Scroll Depth Trigger:
Once we’ve done that, we’re now able to set up a trigger which will tell GTM when to fire our new scroll depth event into Facebook.
Because we have the ‘scroll depth thresholds’ variable enabled we are free to choose at which level we want to trigger our conversion. This probably depends on a number of things such as the length of your content, however for this example let’s assume you want to know which ads or ad sets are sending people that view 100% of your content.
To do this, create aa new trigger, select ‘Scroll Depth’ as the trigger type. Then select ‘Vertical Scroll’ and enter the % of the page viewed you want to use:

Add Your Custom Facebook Tag:
Ok, now we have the trigger ready to fire we now need to create the tag which will send the conversion data to Facebook.
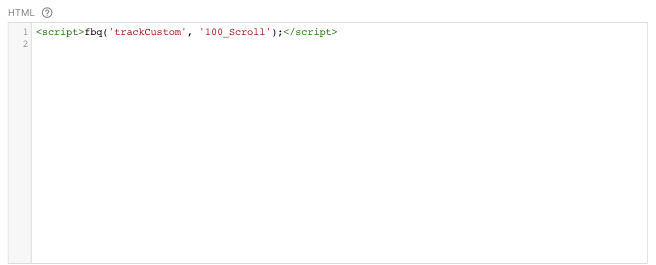
Creating a custom event with the Facebook pixel is really easy – all we need to do is take a standard event and edit it slightly. In this case, we’re going to take the standard lead event:
<script>fbq(‘track’, ‘Lead’);</script>
We then change ‘track’ to ‘trackCustom’ and name the event however we choose:
<script>fbq(‘trackCustom’, ‘100_Scroll’);</script>
Once you’ve edited your tag, simply add this into GTM as a custom html tag and select your previously created scroll depth trigger:
Using GTM Preview Mode to Test:
Before you publish anything at all, the best way to test is to use GTM preview mode. This means you can verify your tag is firing as expected, and that the data is going to pass as required via the pixel back into Ads Manager.
Once you’re in preview mode, head to one of your landing pages, scroll to the bottom and if all is correct you should see your new Facebook tag fire as you hit the bottom of the page:

Nice! Also, if you have the pixel helper chrome extension installed then you can also check that the pixel is sending the event correctly:
![]()
Great – everything is working! Now go ahead and publish the changes you’ve made within the GTM container.
Setting up Your New Custom Conversion:
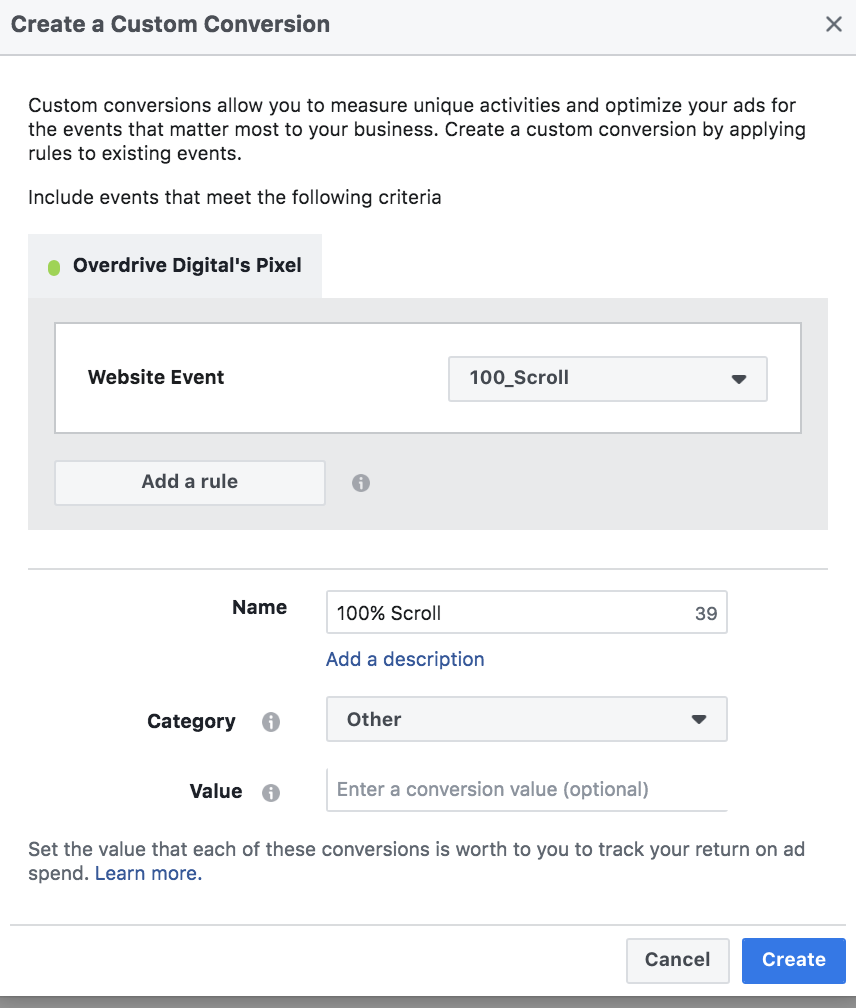
The final step is to configure your new custom conversion in your account. If you’ve made it this far this final step should be super easy!
Before you do anything, make sure you’ve triggered your new event a few times so that the Ads Manager can recognise that this new event has been created. You’ll also need to wait for 10-15 minutes for the new event to appear, so pop the kettle on and make a cuppa.
To create your custom conversion, head to the pixel section of the Ads Manager and you’ll see the custom conversion section right there. Once you’ve clicked to create a new custom conversion you should see your event appearing as an option in the dropdown:
And there you have it! You’ll now be able to track performance against the number of times someone reads a complete article or landing page as a result of clicking your ads.