
Since starting at Overdrive Digital my favourite thing has quickly become Google Tag Manager. I swear I don’t have shares in it (but maybe I should, considering how much I advocate for its use).
Google Tag Manager enables you to set up the majority of tracking on your website without having to hardcode a thing. No worries about breaking code or doing any damage to your website whatsoever.
For anything custom you will need to implement dataLayer changes, however on the whole it eliminates the need for lots of dev resource when setting up tracking and means you are able to get things moving along faster! Always a winner if you ask me.
Google Tag Manager is a critical element in the setup process of any Paid Social campaign. It allows you to track metrics that are important to your campaign. No vanity metrics here, just clear cut, measurable KPIS.
To provide an example, we were recently running an event campaign for a client that needed to get tracking set up quickly, but didn’t have fast access to their Eventbrite page. In this case, our best option was to track exit clicks to the page on Eventbrite.
In this scenario, where you are running a paid social campaign where the goal is to accumulate exit clicks to an Eventbrite page you would set up tracking for:
- All Page Landing Page Views
- Exit Click to Eventbrite
With Eventbrite, if you have control over the profile you can place your pixel directly on the order confirmation page, however in some scenarios this isn’t possible due to not always being able to get quick access to the page. When this is the case, tracking exit clicks to the event page on Eventbrite at least gives you a good indication of performance.
Not only does this enable you to see the metrics that matter to that specific campaign, it also allows you to build retargeting audiences and lookalikes of potential candidates to work from in other campaigns.
So how do I do it you ask?
Let me take you through a recent example step by step where we used set up a custom tag called Initiate Booking to track exit clicks to an Eventbrite page.
First you need to go to the Events Manager Tab on your Ads Manager.
Here you will click the Set Up in the left-hand corner, click this and select Set Up New Events.
Select Manually Add Event Code – This may sound intimidating it isn’t!
Select Ecommerce and Retail from here you will see a list of options.
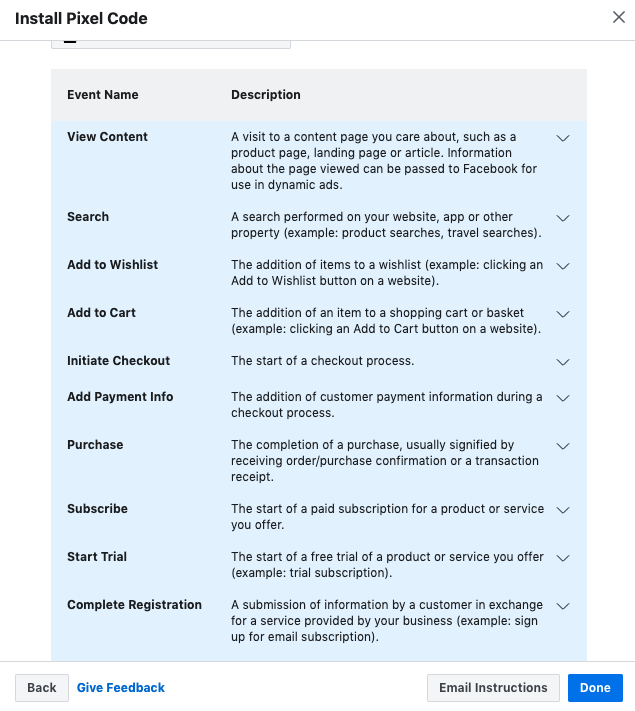
Here select Initiate Checkout as this most closely mimics the action of initiating a booking.
Once you click on Initiate Checkout it will display a code. Copy this snippet of code.

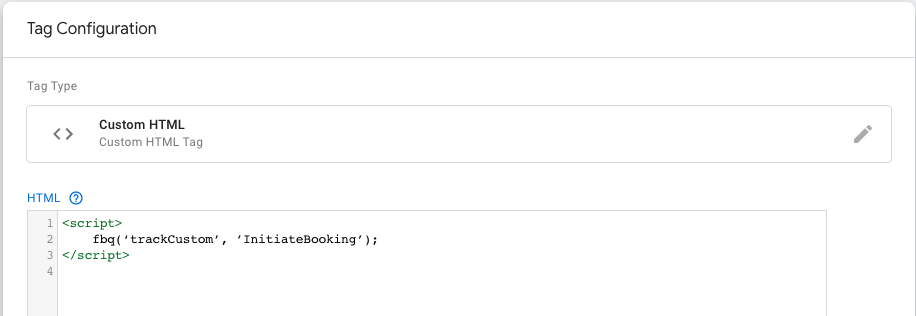
Once you have the tag you can change ‘track’ to ‘trackCustom’ and then name the event ‘InitiateBooking’ as required:
<script>
fbq(‘trackCustom’, ’InitiateBooking’);
</script>
Now in Tag Manager you will need set up a new Tags. Go to Tags and click New on the left hand side.
Firstly remember to name your Tag something that you are easily able to identify. For example Abi | Facebook – Initiate Booking. This is particularly important if you are working in a Tag Manager account that already has some tracking set up.
Click anywhere on the Tag Configuration Box to select a Tag Type. When implementing a Facebook Pixel always select Custom HTML Tag on Tag Configuration – Again this may sound intimidating, but this is simply that little snippet of code that you have already copied from Events Manager in Facebook.
Paste the snippet of code you have already copied from Events Manager here.
Now click anywhere on the Trigger to select a trigger to fire for this Tag.
In the left hand corner there is a Blue Plus Sign, click this to create a new trigger.
First off name your Trigger something that you are easily able to identify. For Example Initiate Booking – Book Now Click.
Click anywhere on the Trigger Configuration Box, a drop down menu will appear on the left hand side of the screen.
We are going to measure Initiate Booking by someone exiting our website to view the Eventbrite page. To do this, we need to setup a trigger that fires when the action of someone clicking an exit link to eventbrite.co.uk takes place.
Select Click – All Elements then select, This trigger fires on Some Clicks.
Now select Click URL, Contains then enter in the snippet of URL that is relevant, here it is www.eventbrite.co.uk/.

Be sure to save your changes, check that everything is functioning in preview mode and the submit your changes!
So often when we start working with businesses they aren’t tracking key KPIS at all or the conversions aren’t being tracking properly.
Google Tag Manager enables us to set up tracking quickly which in turn means we are able to get started on projects faster with full confidence that our KPIS are being measured accurately.
Happy Tagging ‘Yal!