Facebook Lead forms are great, but what makes them so good can also be their downfall in certain campaigns. The problem is, they are just too easy for a potential customer, or even non-potential customer to complete. This means that an excellent CPL can sometimes mask dire quality when it comes to the leads these campaigns generate.
So, the question really becomes how to measure lead quality or how to get a clear view on qualified leads vs. those that have either completed the form by mistake, or those that simply aren’t serious about enquiring on your offer.
The ultimate answer to this problem is to ensure you have a connection with your CRM so that any lead can be followed through to a sale, thus enabling you to reverse engineer successful leads and optimise for eventual revenue.
But what about a more immediate indicator that your lead form campaigns are delivering value?

Let’s say your process is as follows; customer completes a lead form on Facebook, you then automate a follow up email which gives an overview of your business and the offer that you are promoting. It stands to reason that anyone with a genuine interest would respond by wanting to read up more and therefore clicking through to your website or landing page. We could, in theory, use this action as a qualifier for genuine interest.
Thankfully, Facebook allows us to set up custom conversions for almost any action. Therefore, what if instead of reporting on lead form completions, we could report on clicks through from your follow up emails and therefore get a sense of which ad sets and audiences are generating the highest quality of leads?
The flip side to setting this up is that not only could you then report on quality leads, you can also train the pixel to optimise your ad delivery towards those most likely to take a follow up action. You could even build custom audiences based on the most interested new leads from your campaigns to retarget with future offers. That’s all pretty powerful!
(Before we go much further, it would only be right to point out that a portion of what you’ll see below has been kick-started / inspired by this post by Semetis)
Here’s how you do it…
For the purpose of this post we’re going to assume that you’ve implemented your Facebook pixel via Google Tag Manager, and that you are generally familiar with the structure of triggers and tags within GTM. We are also assuming that your email campaign links are tagged up correctly with ‘utm_medium’ and ‘utm_campaign’.
Step 1 – extract UTM_medium
The first thing we need to do is be able to extract ‘utm_medium’ from any landing page URL. This is done by adding the following script as a custom HTML tag within Google Tag Manager.
Simply set up a new tag, name it as you wish, and add the following script:
<script type=”text/javascript”>
/// get the url and the key to find
var url = window.location.href;
var keyToFind = ‘utm_medium’;
/// is there a utm medium ?
if(url.indexOf(keyToFind + ‘=’) > -1)
{
var valueFound = url.substr(url.indexOf(keyToFind + ‘=’) + keyToFind.length + 1).split(‘&’)[0];
localStorage.setItem(keyToFind, valueFound);
}
</script>
Step 2 – Extract utm_campaign
Additionally, in order to set triggers in GTM based on specific email campaigns (i.e your automated follow up emails), we will need to repeat the step above by adding a tag with the slightly amended script below:
<script type=”text/javascript”>
/// get the url and the key to find
var url = window.location.href;
var keyToFind = ‘utm_campaign’;
/// is there a utm campaign?
if(url.indexOf(keyToFind + ‘=’) > -1)
{
var valueFound = url.substr(url.indexOf(keyToFind + ‘=’) + keyToFind.length + 1).split(‘&’)[0];
localStorage.setItem(keyToFind, valueFound);
}
</script>
Step 3 – Create Custom Variables
Once we have the two above tags in place and ready to listen for our ‘utm_source’ and ‘utm_campaign’, we will then need to set up a custom variable to extract the value of each.
To do this, navigate to ‘Variables’ in GTM and create a new Custom JavaScript variable. For the first one (utm_source) add the following script:
function()
{
return localStorage.getItem(‘utm_medium’);
}
And for the second variable (utm_campaign) add the following:
function()
{
return localStorage.getItem(‘utm_campaign’);
}
Step 4 – Create Facebook Custom Event
As alluded to at the beginning of this post, one of the great things about Facebook is you can set goals and events for almost any action.
Taking the standard ‘lead’ event which is provided as apart of the pixel setup process, editing it to the below means we are then creating a custom event specifically for ‘qualified campaign clicks’:
<script>
fbq(‘trackCustom’, ‘Qualified Campaign Clicks’);
</script>
You can then paste the script above into a custom HTML tag in GTM and set the trigger as per the details below.
Step 5 – Create Your Trigger
Now that we are able to extract utm_medium and utm_campaign values via our custom variables, this means we can set our trigger based on specific values. As a result, we can ensure that our custom Facebook event will only fire when the traffic source in question meets our criteria.
It goes without saying that in order to make this work reliably, you first need to make sure that all email campaigns feature a consistent tracking structure. Obviously this will be different for everyone, but let’s assume the following for this example:
utm_medium=email
utm_campaign=fb_welcome_email
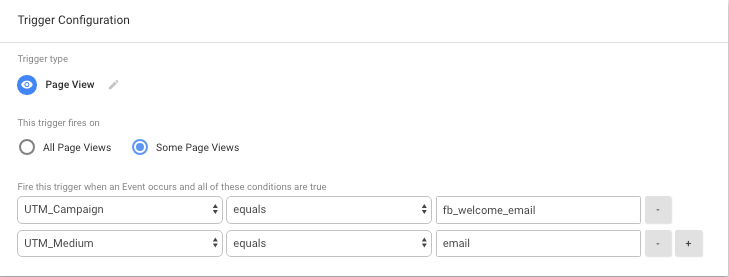
In order to trigger our custom event for traffic clicking through from our automated welcome emails, we will need to set the trigger in GTM as follows:
UTM_Source equals “email”
AND
UTM_Campaign equals “fb_welcome_email”
You can now update your custom event to fire with the specified trigger above.
Don’t forget that it’s always a good idea to test your set up in GTM preview mode. Once in preview mode, navigate to a URL and append the UTM parameters as they would be in your email campaign.
For example: http://overdrivedigital.co.uk/?utm_medium=email&utm_campaign=fb_welcome_email
And yes, there we go – we can see that our custom event ‘FB – Qualified Clicks’ has fired correctly:

Using the pixel helper, we can also see that the event has been passed through to Facebook as per our requirements:
![]()
Step 6 – Set Your Custom Conversion
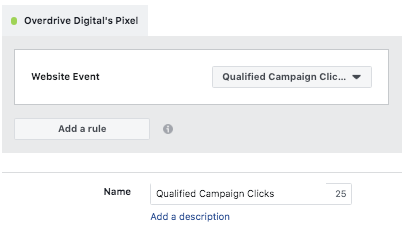
The final step in the process is to set up a custom conversion in the Facebook Ad Manager. If you have never done this before, custom conversions can be set on various types of pixel activities such as pageviews on specific URL paths, or when a specific event occurs.
In this case, you’ll want to set your custom conversion up for whenever your ‘Qualified Campaign Click’ event is fired:
And there you have it. You can now set up reporting against your lead form campaigns to measure the volume (and cost) of qualified follow up clicks, but also optimise the delivery of your campaigns towards people who are more likely to have a genuine interest in what you are offering.